September 21, 2016

How to make Anarkalis (Part-2) - Single Piece Anarkali & Panel Anarkalis?

In my previous post, I had shown pattern making of  Circular Skirt Anarkalis and its variations.
In this post, I will show step-wise pattern making of Single Piece Anarkali & Panel Anarkali with its variations.

* The pictures and instructions are offered here for free. Please don't repost any of my content without permission. Thanks!

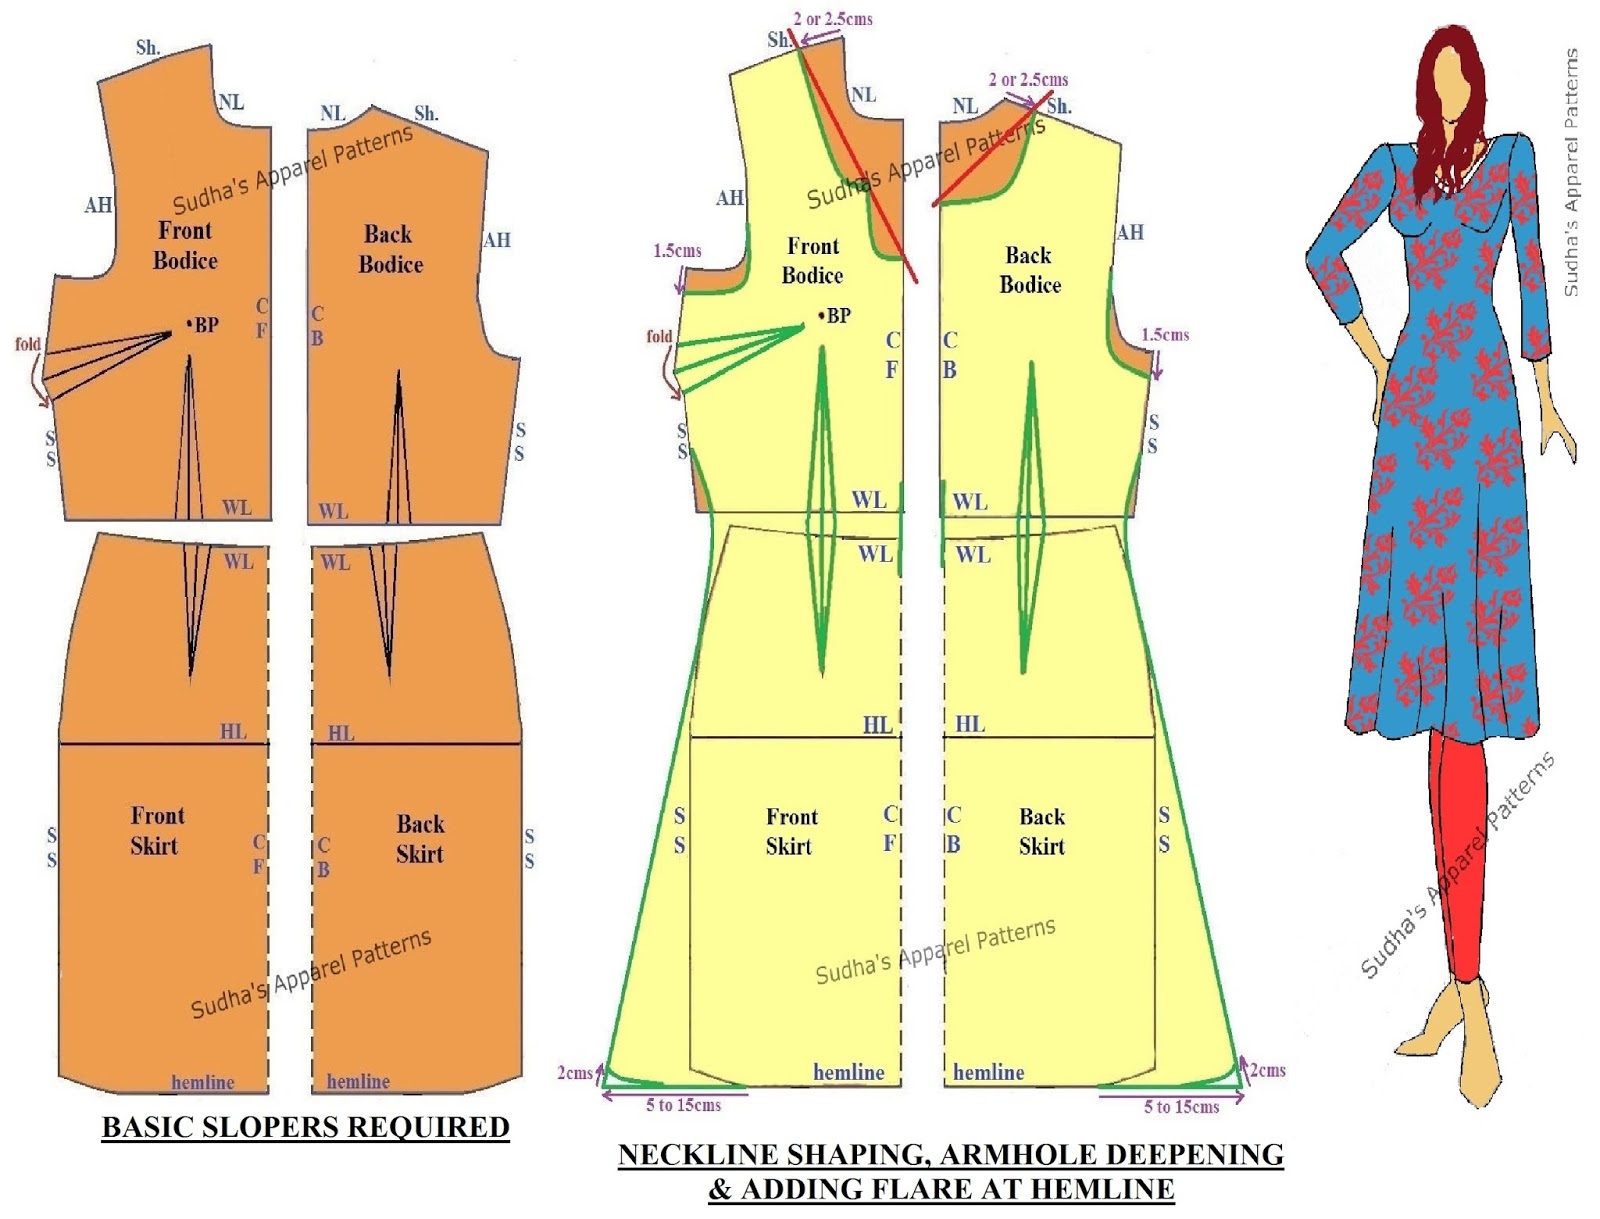
SINGLE PIECE ANARKALI
Though the name suggests single piece, you can have a variation by adding yokes & flare to this dress. I will be showing the draft with only flare. For this pattern we need -
1. Step-3 of Front Bodice (with side seam oblique dart & waist dart) from Basic Dart Manipulations in Women's wear {Two Darts}
2. Back Bodice (with waist dart) from Women's wear Basic Bodice {till waist} [Front & Back].
3. Basic Skirt with waist darts (Front & Back).
How to make Single Piece Anarkali?
- Trace Front Bodice with side seam oblique dart & waist dart. Below this bodice, trace Front of basic skirt draft. Similarly, trace Back Bodice with waist dart & below that bodice, trace Back of basic skirt.
- For flare, move outwards from hemline by 5 to 15 cms. depending on how much flare is required.
- Using a scale move up towards hip line, join this flare point to hip curve (i.e. merge slant line into curve).
- At the hem and side seam corner, move up on slant line by 2cms (see image) and give a slight curve shaping to the hem.
- Also make  Basic Sleeve pattern, and further modify the length of sleeve as required.

PANEL ANARKALI 
There are 3 variations in Panel Anarkali - 
    (1) Half panel, (2) Full (lengthwise) Panel & (3) Horizontal Panel.
(1) Half Panel Anarkali Dress:-
- This pattern has vertical panels running below front and back yokes.
For Half Panel Anarkali, we need to make paper pattern of:-
a) Anarkali Front Yoke
b) Anarkali Back Yoke
c) Panels of Anarkali
d) Sleeve
For making Yoke of Half Panel Anarkali, trace Front bodice with its darts from Basic Bodice Sloper (till waist) [Front & Back] made with personal body measurements.
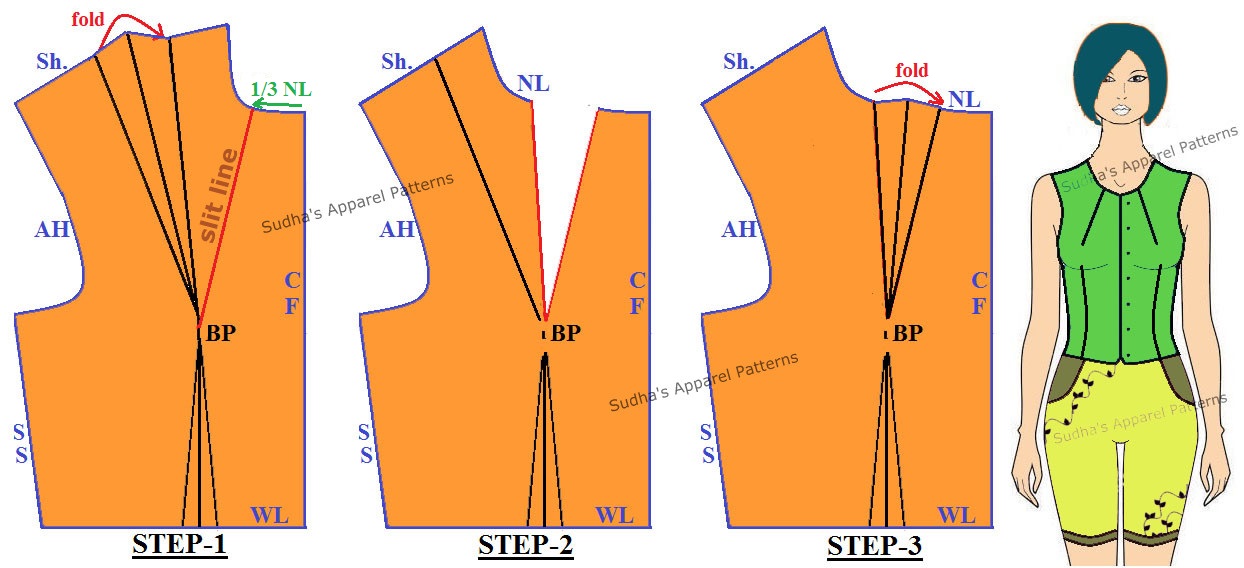
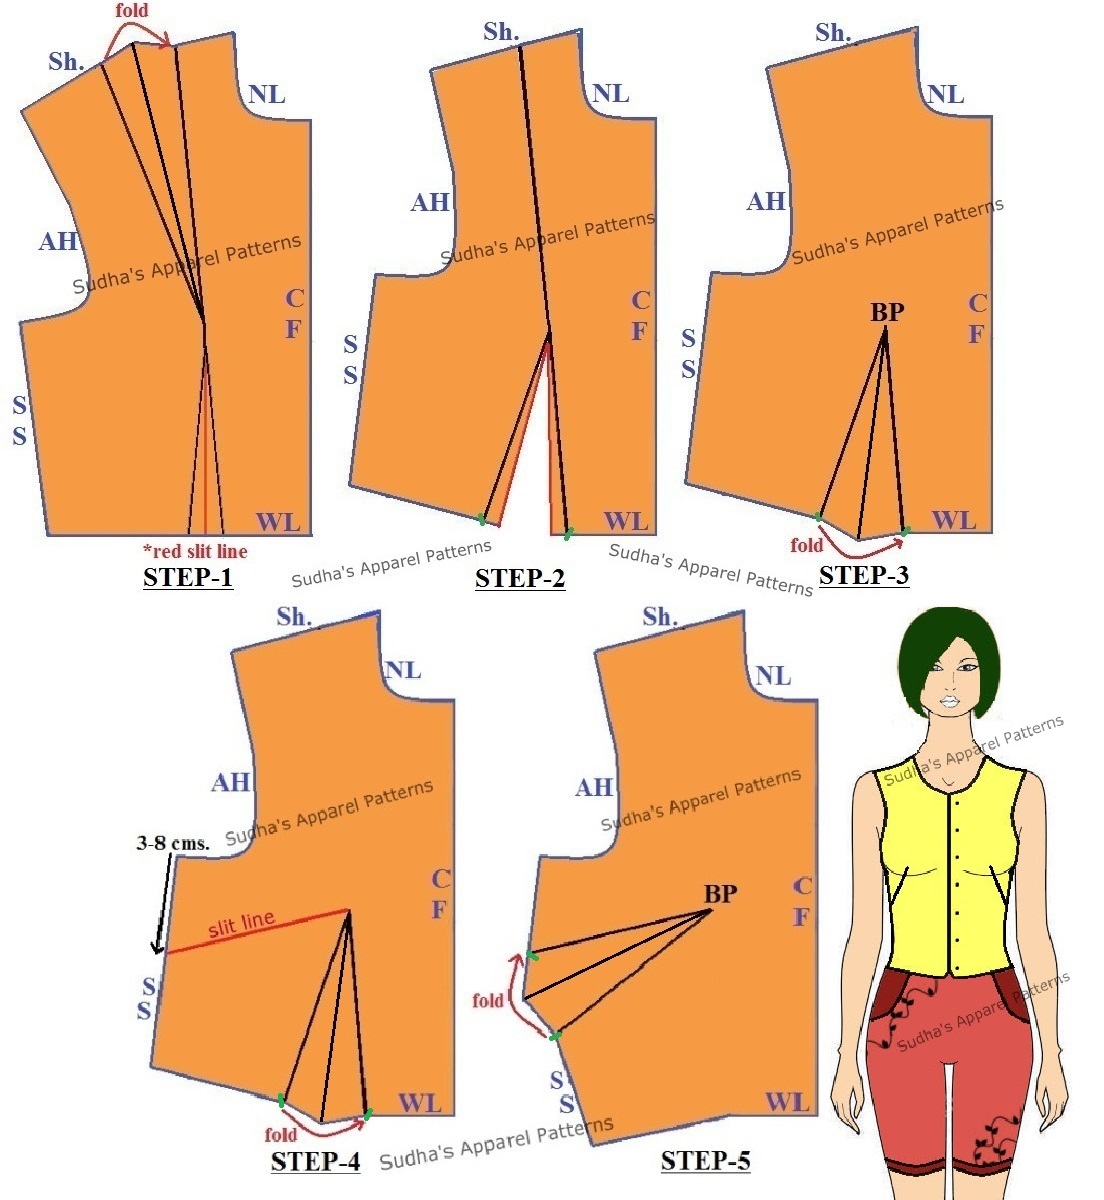
- Transfer only shoulder dart of Front bodice to side seam oblique dart. * To learn stepwise transfer of shoulder dart to side seam oblique dart, refer "Basic Dart Manipulations in Women's wear (two darts)".
How to make Half Panel Anarkali?
- Trace Front with side seam oblique dart & waist dart (i.e. Step-3 of basic dart manipulations). Below this bodice, trace Front of basic skirt draft. 
- Similarly, trace Back Bodice with waist dart from Basic Bodice Sloper (till waist) [Front & Back] & below that bodice, trace Back of basic skirt.
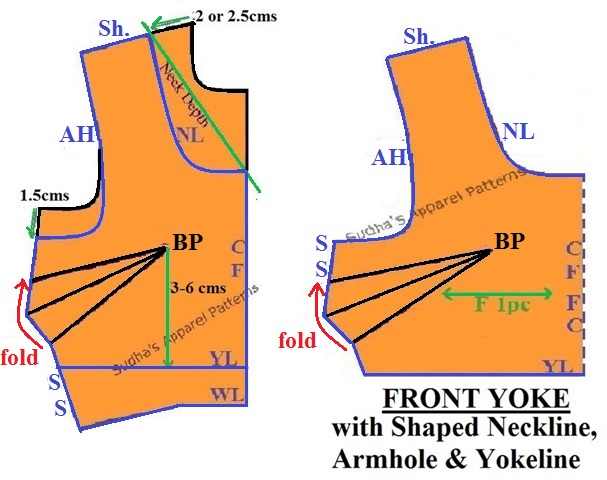
- For how to do Neckline Shaping, Armhole Deepening and Yokeline Marking of Anarkali Yokes (Front & Back), you can refer Anarkalis (Part-1)- Circular skirt & its variations.
- Length of the Anarkali panels can be extended straight down below knee (i.e. hemline) as required.
- Divide the yoke line of Front and Back as per number of panels required. I have divided the yoke line in 4 parts, so I will get total of 8 panels in front & 8 at back.
# Some Tip: Marking each panel is necessary to avoid confusion later on when panels are cut. 
- I have marked each panel as B1, B2, B3, B4 (for Back panels) & F1, F2, F3, F4 (for Front panels).
How to make Half Panel Anarkali?
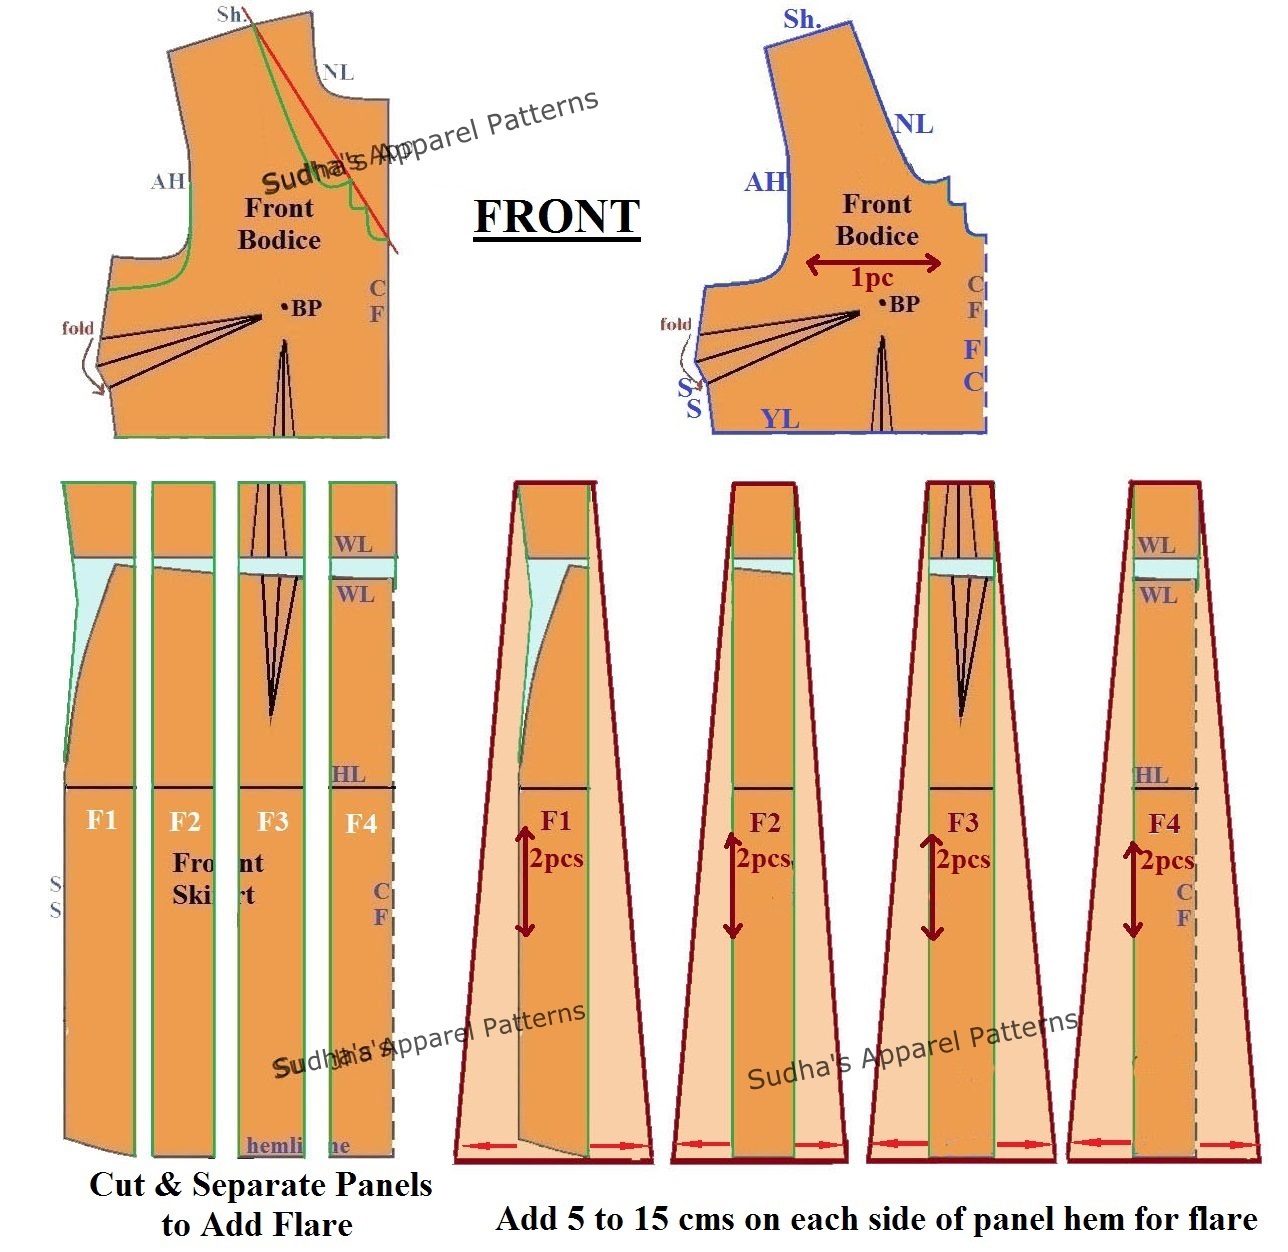
- These panels are straight. For Anarkali dress, we need to add flare to each panel of Front & Back.
- Hence, once you number each of these panels; cut, place and trace them on a separate paper to add required flare (see above image).
- For adding flare, extend hem of each panel towards its left & right side by 5 to 15 cms.
# Some Tip: Work on one panel extension at a time.
- Once you extend the hem on either sides of each panel, join extended hemline (using scale) in a slant line moving upwards at top of panel (see above image).
- With the same method, add flare to each of the front & back panels.
- Final panels of Front and Back of Anarkali dress are marked in Maroon color.
- Also make  Basic Sleeve pattern, and further modify the length of sleeve as required.

(2) Full Panel (Lengthwise) Anarkali:-
- For full panel Anarkali (i.e. lengthwise panels), trace Front bodice with side seam oblique and waist darts & below this bodice, trace front basic skirt draft (see below image).
How to make Full (Lengthwise) Panel Anarkali?
- To mark the straight panels, mark red horizontal chest line, waist line and hem line (refer image).
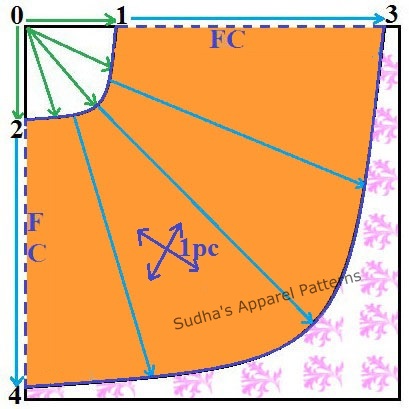
- Measure & divide the chest line, waist line and hem line in equal parts.
- Draw straight green lines starting from neck, shoulder and armhole towards hem line (refer image).
# Some Tip: Marking each panel is necessary to avoid confusion later on when panels are cut. 
- I have marked each panel as B1, B2, B3, B4 (for Back panels) & F1, F2, F3, F4 (for Front panels).
How to make Full (Lengthwise) Panel Anarkali?
- These panels are straight (except the panel with side seam) and for Anarkali dress, we need to add flare to each of these panels of Front & Back.
- Once you number each of these panels; cut, place & trace them on a separate paper to add required flare (see image).
- For adding flare, extend hem of each panel towards its left & right side by 5 to 15 cms.
# Some Tip: Work on one panel extension at a time.
- Extend the hem on either sides of each panel and join the extended line in a slant line (using scale) moving up towards the waist line (refer image).
- With the same method, add flare to each of the Front and Back panels.
- Final panels of Front and Back of Anarkali dress are marked in Maroon color.
- Also make  Basic Sleeve pattern, and further modify the length of sleeve as required.

(3) Horizontal Panel / Tier Anarkali Dress:-
This pattern has horizontal panels running below front and back yokes.
For Horizontal Panel Anarkali, we need to make paper pattern of:-
a) Anarkali Front Yoke b) Anarkali Back Yoke c) Panels of Anarkali d) Sleeve
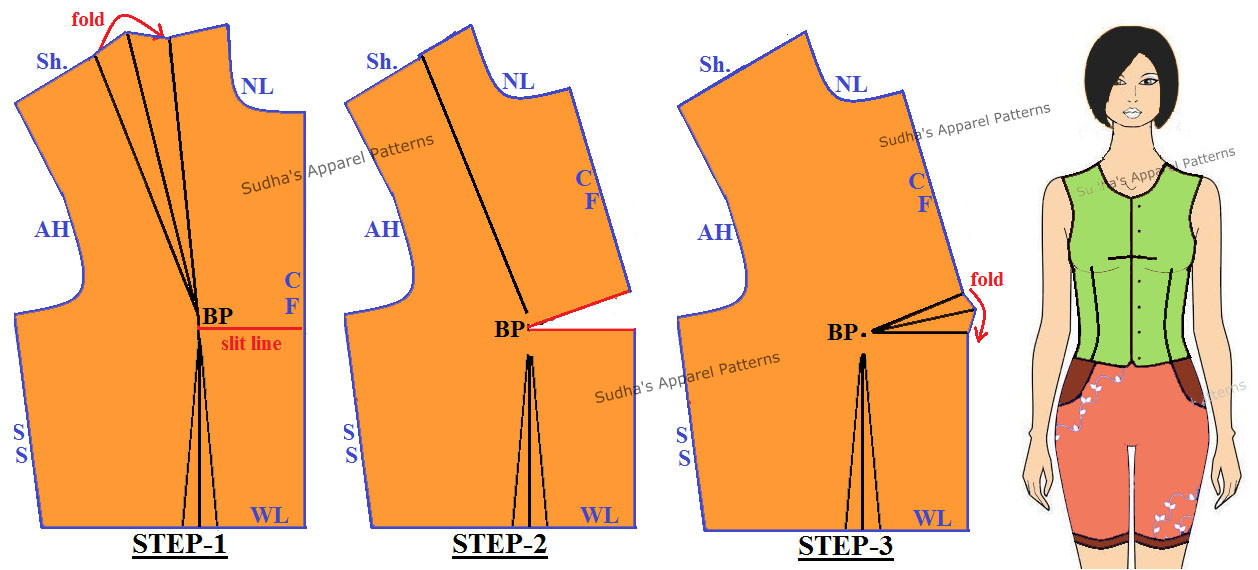
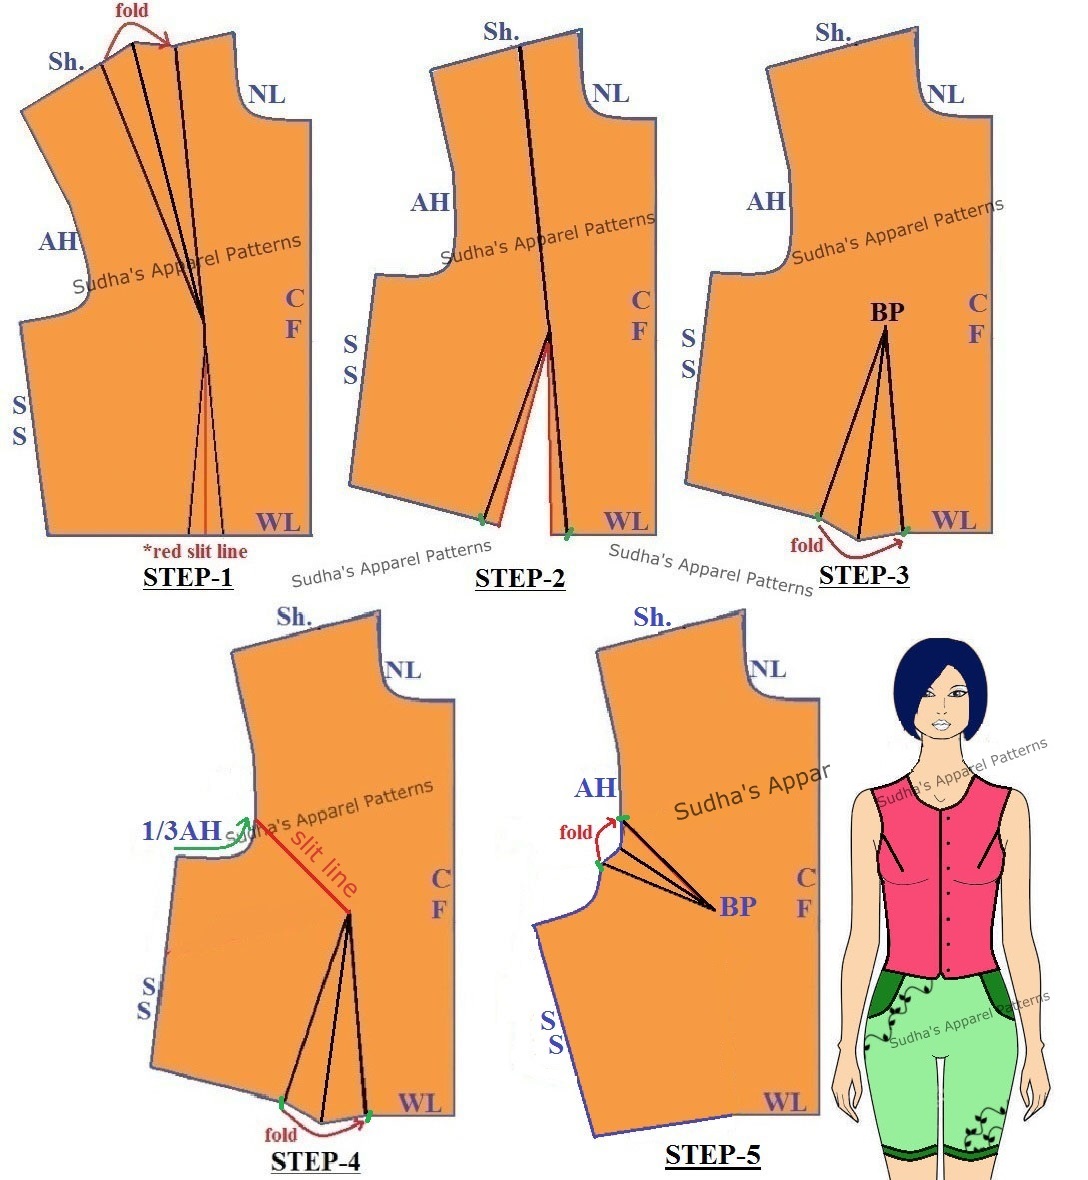
For making Yoke of Horizontal Panel Anarkali, trace the Front bodice draft having shoulder, neckline, armhole, side seam, waist line and its two darts i.e. shoulder & waist dart. [Refer Basic Bodice Sloper for tracing Front]
- For making the Anarkali yokes, we have to transfer these 2 darts (i.e. shoulder & waist dart) to side seam oblique dart. * To learn stepwise transfer of these darts to side seam oblique dart, refer "Basic Dart Manipulation in Women's wear"
- Take Front with side seam oblique dart (i.e. Step-5 of basic dart manipulations) & further alter it step-wise for Neckline Shaping, Armhole Deepening and Yokeline Marking of Anarkali Yokes (Front & Back), [Refer Circular Skirt Anarkalis and its variations.]
How to make Horizontal Panel / Tier Anarkali?
Panel Width (How to calculate?):-
- When calculating width of each panel, calculate for both front & back panels together and then divide each panel lengthwise into half for attaching it to front and back yoke separately. 
- For example; If Round Waist is 30" then Panel-1 will be 30" x 1.5 = 45". This 45" width will be cut lengthwise & separated into half, where one part will be attached below front yoke & other part will be attached to back yoke.
- For every next Panel, add 20" to 30" to total width of previous panel depending on required flare.
- For example; If Panel-1 = 45" then Panel-2 = 45" + 20" to 30". Since, I am adding 20", my panel calculation is as follows:-
How to make Horizontal Panel / Tier Anarkali?
Panel Length (How to calculate?):-
- Length of the Horizontal Anarkali dress, should be calculated from below yoke line till either knee or below knee or till floor.
- For example; I have measured the length as 40" (from below yoke line) and I have 5 horizontal panels. So I will use the formula as 1/5th of length i.e. 40"/ 5 = 8". 
- Hence, the length of each panel (without seam allowance) will be 8".
- These panels can vary in its width and length depending on the total available yardage.
- Also make  Basic Sleeve pattern, and further modify the length of sleeve as required.
------------------------------
I hope this post was helpful to you.
Please leave your valuable comments / queries and I will be happy to reply.☺☺

If you enjoyed this post, I’d be very grateful if you’d help it spread by emailing it to a friend, or sharing it on Twitter or Facebook. Thank you!

Stay connected on 
Facebook / Pinterest / Twitter / 

**********************
You might also like to learn:

September 19, 2016

How to make Anarkalis (Part-1) Circular skirt Anarkali & its variations?

An Anarkali is a form of women's apparel which has been explored by many fashion designers in Indian fashion industry. It is basically a suit in the form of a long, frock-style top combined usually with a slim fitted bottom garment, known as "Churidaar". A stylized design may also have the Anarkali paired with either a "Salwaar" or straight cut "Trouser".
It is said that Anarkali suit owes its name from the fictional character named Anarkali, who was said to be a courtesan in the court of Mughal Emperor Akbar. 
It's an extremely popular style adorned by women of Northern India, Pakistan and The Middle East. Anarkali is one such garment that can be made as a simple casual wear for daily use to a more heavily embellished and embroidered special occasion wear like weddings, festivals, parties.

* The pictures and instructions are offered here for free. Please don't repost any of my content without permission. Thanks!

-------------------------------

Basic styles in Indian Anarkali are:
A. Circular Skirt Anarkali which has variations
(1) Half Circular, (2) Full Circular.
B. Single Piece Anarkali.
C. Panel Anarkali which has 3 variations
(1) Half panel, (2) Full (lengthwise) Panel & (3) Horizontal Panel.
Apart from these basic styles, today Anarkali is designed in a variety of stylized versions.
-------------------------------

In this post, I have shown step-wise pattern making of Circular skirt Anarkali & its variations.
CIRCULAR SKIRT ANARKALI
For Circular Skirt Anarkali, we need to make paper pattern of:-
a) Anarkali Front Yoke
b) Anarkali Back Yoke
c) Circular Skirt of Anarkali
d)  Basic Sleeve

How to draft an Anarkali Yoke (Front & Back) using your Bodice Block?
You can use Front and Back Bodice pattern - till waist (made using your own personal body measurements) to make Front and Back Yokes of Anarkali.

a) Anarkali Front Yoke:-
- Trace Front Bodice draft having shoulder, neckline, armhole, side seam, waist line and its two darts i.e. shoulder & waist dart.
- For making the Anarkali yokes, we have to transfer these 2 darts (i.e. shoulder & waist dart) to side seam oblique dart.
- Make Step-5 with Side seam Oblique dart by referring "Basic Dart Manipulation in Women's wear {Single dart}".


Step-1 - Neck Shaping:
- To shape the neckline as per required pattern, go inward from neck-shoulder point by 2 or 2.5 cms.
- From that point, mark the neck depth point (using a scale) on Centre Front of bodice.
- Join these two points based on required neck pattern.
* I have used a basic Round neckline pattern.
Step-2 - Armhole Deepening:
- Deepen the armhole by 1.5 cms from armhole-side seam point.
- Draw a new arm curve running parallel to original arm curve and merge as shown in image.
Step-3 - Yoke line Marking:
- Come down from bust point (B.P) by 3 to 6 cms. as required and mark the yoke line.

b) Anarkali Back Yoke:- 

- Trace Basic bodice Back draft having shoulder, neckline, armhole, side seam, waist line and its waist dart.

- Following the steps of Anarkali Front Yoke (i.e. Neckline and Armhole deepening), make the final pattern of Anarkali Back bodice. (refer image).

- To mark the Yoke line of Back bodice, measure the side seam (after folding the side seam dart) of Final Front Yoke (i.e. measure from deepened Armhole till Yoke line).

- Mark whatever is the "x" measurement (of side seam of Final Front Yoke) on the Back bodice side seam and draw the yoke line of Anarkali back.

c) Circular Skirt of Anarkali:- Once the front and back blocks of Anarkali yokes are ready, measure the Total length of front yoke line + back yoke line  (YL). 
Since the circular skirt starts from below yoke line, #Total length of front + back yoke lines can be considered as Round Waist measurement when making the pattern for circular skirt of Anarkali.#
From these yoke lines, measure downwards required skirt length for Anarkali pattern. 
- * Skirt length can be till Knee or below Knee or till Floor. 
- Flare of Circular Anarkali Skirt will vary depending on requirement. I usually prefer to utilize maximum fabric & avoid wastage. However, you can have 2 basic types of circular Anarkalis:- 
1. Full Circular Anarkali:
- Draw a square with approx. Skirt length + Round waist measurement.

- Draw diagonal lines passing through centre as shown in side diagram.

- From intersection of these diagonal lines (i.e. at centre of square), draw a circle = Round waist (RW) / 3.14.

- From this centre circle, measure & mark skirt length circle (side image).

2. Half Circular Anarkali: For half circular Anarkali, fold the fabric twice as shown  in image.
0-1 & 0-2 = 1/6 Round Waist.
- Join 1 & 2 with a curve (refer image)
* green arrows indicate that the curve is at equal distance from 0.
- 1-3 & 2-4 = Skirt length
Join 3 & 4 with a curve (refer image)
* blue arrows indicate that the curve is at equal distance from inner curve of 1 & 2.

Ideally a paper pattern should be used to avoid fabric wastage. However, in case of Circular Anarkali you can mark the required skirt length, round waist circumference and flare of skirt directly on fabric using the curved scale.

I hope this post was helpful to you.
Please leave your valuable comments / queries and I will be happy to reply.☺☺

If you enjoyed this post, I’d be very grateful if you’d help it spread by emailing it to a friend, or sharing it on Twitter or Facebook. Thank you!

Stay connected on 
Facebook / Pinterest / Twitter / 

*********************
You might also like to learn:

September 14, 2016

Basic Dart Manipulations in Women's wear {Two Darts}

This post is a continuation where I will explain how to transfer only shoulder dart of Basic bodice Front to get neckline, centre front horizontal, side seam oblique or armhole dart. As the waist dart of Basic bodice Front is not transferred, we have two darts. 


All single darts end exactly at bust point where as two or more darts end 2 cms. away from bust point.
Similar to Single darts, for this process as well you have to use Basic Bodice Sloper (till waist).
Learn how to make a Women's Wear Basic Bodice {till waist} [with darts].

* The pictures and instructions are offered here for free. Please don't repost any of my content without permission. Thanks!

TWO DARTS
1. Neckline & Waist Dart:
Step-1 - Mark slit line by going 1/3rd on neckline at neckline-centre front intersection point.
Step-2 - Cut slit line and fold shoulder dart as per direction of arrow shown in Step-1.
Step-3 - Trace Step-2 on separate paper with slit neckline dart.
Also trace the waist dart of Basic bodice as is.
* Both darts should be marked 2 cms. away from bust point.
Neckline & Waist Dart
----------------------------
2. Centre Front Horizontal & Waist Dart:
Step-1 - Mark slit line by going perpendicular to centre front line.
Step-2 - Cut slit line and fold shoulder dart as per direction of arrow shown in Step-1.
Step-3 - Trace Step-2 on separate paper with slit centre front horizontal dart.
Also trace the waist dart of Basic bodice as is.
* Both darts should be marked 2 cms. away from bust point.
Centre Front Horizontal & Waist Dart
----------------------------
3. Side seam oblique & Waist Dart:
Step-1 - Mark slit line by 3-8 cms from armhole-side seam intersection point.
Step-2 - Cut slit line and fold shoulder dart as per direction of arrow shown in Step-1.
Step-3 - Trace Step-2 on separate paper with slit side seam oblique dart.
Also trace the waist dart of Basic bodice as is.
* Both darts should be marked 2 cms. away from bust point.
Side seam Oblique & Waist Dart
----------------------------
4. Armhole & Waist Dart:
Step-1 - Mark slit line by  going 1/3rd on armhole at armhole-side seam intersection point.
Step-2 - Cut slit line and fold shoulder dart as per direction of arrow shown in Step-1.
Step-3 - Trace Step-2 on separate paper with slit armhole dart.
Also trace the waist dart of Basic bodice as is.
* Both darts should be marked 2 cms. away from bust point.
Armhole & Waist Dart
Please leave your valuable comments / queries and I will be happy to reply.☺☺

If you enjoyed this post, I’d be very grateful if you’d help it spread by emailing it to a friend, or sharing it on Twitter or Facebook. Thank you!

Stay connected on 
Facebook / Pinterest / Twitter / 
Google+ / YouTube / Instagram

*********************

September 12, 2016

About

Hi there, welcome to Sudha's Apparel Patterns. I don’t know how you made your way to this little blog of mine, but I’m very glad you’re here!

I am Shraddha and as a passionate dressmaker, I write articles on pattern making and sewing of womenswear and kidswear.

In my former life as an assistant lecturer, I learnt how to train novice students in the field of fashion and textiles . These days, I put those hard-won skills to use working as a blogger on a mission to make pattern making and sewing easy and fun to learn.

This blog is for all those who are interested in learning not just sewing but also master the art of apparel pattern making / drafting. So if you are a beginner or a student or even a passionate dressmaker like me, I hope you learn & enjoy all of the projects, patterns & tutorials. Feel free to share your creative ideas as well.

Wondering where to start here on Sudha's Apparel Patterns? 
Maybe one of these posts will catch your fancy:


Thanks for stopping by, feel free to stay a while!

* The pictures and instructions are offered here for free. Please don't repost any of my content without permission. Thanks!

Stay connected on 
Facebook / Pinterest / Twitter / 

I have dedicated this blog to my beloved mum (my Aai).

September 9, 2016

How to make Women's wear Basic Sleeve?

The Basic Sleeve draft is based on the Women's Wear Basic Bodice {till waist} [with darts]

* The pictures and instructions are offered here for free. Please don't repost any of my content without permission. Thanks!

Before you make the Basic sleeve draft, measure the armhole circumference from women's wear Basic bodice accurately with a measure tape. In order to ensure perfect fit of sleeve and at the same time to ease movements, add 3-5 cms to the measured armhole circumference. 

Begin with top left corner of the square. This is point A.
A-B = 1/2 Size – 1 cm
* Size means 1/2 Round Chest. For example; if Round Chest is 88 cms., then Size is 44 cms.
C = 1/2 of A-B
A-D = 1/10 size + 0.5 cm
A-E = 1/10 body height
B-E1 = Parallel to A-E
Copy measurements from the opposite side and connect points B1-D & E-E1
C-C1 = Square down from point C up to line E-E1
E-F = Equal measurement of line I-C1 + 0.5 cm if required (from back bodice) 
E1-F1 = Equal measurement of line M2-C2 + 0.5 cm if required (from front bodice)
[# refer Women's Wear Basic Bodice {till waist} [with darts]]
E-M =Move up 5 cms
M-N = Square left 1 cm
E1-M1 = Move up 5 cms
B1-B2 = Move left 3.5 cms
D-D1 = Move right 3 cms and use a curve to draw the sleeve cap. 
Connect points F-N-D1-B2-M1-F1 (armhole). 
C-H = Elbow length
C-I = Sleeve length
I-L = Square left from point I the same measurement as line C1-F – 2.5 cms
I-L1 = Square right from point I the same measurement as line C1-F – 2.5 cms. 
Connect points L-F, L1-F1
Some Tip: *Sleeve ease may change according to fabrics and sleeve style line as it happens to the wrist width.

Once your Basic Sleeve is made on paper, do check its fitting by stitching & attaching the sleeve to Basic bodice before you proceed to use this draft as a base for all your future garment patterns. Just place & cut the sleeve pattern on a basic cotton muslin fabric by keeping seam allowance of 1 cm. on all sides.
*Best fit of the basic sleeve is when there are no creases / gathers formed on this stitched rough pattern.*

I hope this post was helpful to you.
Please leave your valuable comments / queries and I will be happy to reply.☺☺

If you enjoyed this post, I’d be very grateful if you’d help it spread by emailing it to a friend, or sharing it on Twitter or Facebook. Thank you!

Stay connected on 
Facebook / Pinterest / Twitter / 


*********************
You might also like to learn:-

September 5, 2016

Basic Dart Manipulations in Women's wear {Single Darts}

Darts are added to a garment as they take up the excess fabric and help to fit the pattern on body contours. In a Basic Bodice pattern of women's wear there is shoulder and waist dart in front and only waist dart at back. On Basic Skirt Sloper, there are two waist darts each at front and at back. 
Darts are formed to fit body contours that vary in shape and size and they may appear as straight, concave and convex converging lines on finished garment.

Dart Manipulation is a process where the shoulder dart and waist dart of Women's Wear Basic Bodice {till waist} [with darts] Front is transferred / shifted to either a Big waist dart, French dart, Side seam oblique dart, Armhole dart, Neckline dart or Centre front horizontal dart. As these are all single darts, they end exactly at the bust point. These darts can be manipulated to any two or more darts as well. However, if there are two or more darts then they end 2 cms. away from bust point.
In this post, I have shown step-wise transfer of shoulder dart and waist dart (of Women's Wear Basic Bodice {till waist} [with darts] Front) to basic Single darts. For this, you have to use Basic Bodice Sloper (till waist).

Learn how to make a Women's Wear Basic Bodice {till waist} [with darts]

* The pictures and instructions are offered here for free. Please don't repost any of my content without permission. Thanks!

SINGLE DARTS
1. Big Waist Dart:
Step-1 - Mark slit line in centre of waist dart.
Step-2 - Cut slit line and fold shoulder dart as per direction of arrow shown in Step-1.
Step-3 - Trace Step-2 on separate paper & mark big waist dart. (trace green markings of dart).
* The dart will be marked till bust point as all single darts end at bust point.
Big Waist Dart

* For all the below mentioned darts, I have used Step-3 of Big Waist dart.*
-------------------------------------------------------------
2. French Dart:
Step-1 - Mark slit line in centre of waist dart.
Step-2 - Cut slit line and fold shoulder dart as per direction of arrow shown in Step-1.
Step-3 - Trace Step-2 on separate paper & mark big waist dart. (trace green markings of dart).
* The dart will be marked till bust point as all single darts end at bust point.
Step-4 - Mark & cut slit line at waist line-side seam intersection point.
Fold waist dart as per direction of arrow shown in Step-3 to open side seam slit.
Step-5 - Trace Step-4 on separate paper & mark french dart.
* The dart will be marked till bust point as all single darts end at bust point.
French Dart
-------------------------------------------------------------
3. Side seam Oblique Dart:
Step-1 - Mark slit line in centre of waist dart.
Step-2 - Cut slit line and fold shoulder dart as per direction of arrow shown in Step-1.
Step-3 - Trace Step-2 on separate paper & mark big waist dart. (trace green markings of dart).
* The dart will be marked till bust point as all single darts end at bust point.
Step-4 - Mark & cut slit line by going 3-8 cms. down from armhole-side seam intersection point.
Fold waist dart as per direction of arrow shown in Step-3 to open side seam slit.
Step-5 - Trace Step-4 on separate paper & mark side seam dart.
* The dart will be marked till bust point as all single darts end at bust point.
Side seam Oblique Dart
--------------------------------------------------------
4. Armhole Dart:
Step-1 - Mark slit line in centre of waist dart.
Step-2 - Cut slit line and fold shoulder dart as per direction of arrow shown in Step-1.
Step-3 - Trace Step-2 on separate paper & mark big waist dart. (trace green markings of dart).
* The dart will be marked till bust point as all single darts end at bust point.
Step-4 - Mark & cut slit line by going 1/3rd on armhole at armhole-side seam intersection point.
Fold waist dart as per direction of arrow shown in Step-3 to open side seam slit.
Step-5 - Trace Step-4 on separate paper & mark armhole dart.
* The dart will be marked till bust point as all single darts end at bust point.
Armhole Dart
------------------------------------------------------------
5. Neckline Dart:
Step-1 - Mark slit line in centre of waist dart.
Step-2 - Cut slit line and fold shoulder dart as per direction of arrow shown in Step-1.
Step-3 - Trace Step-2 on separate paper & mark big waist dart. (trace green markings of dart).
* The dart will be marked till bust point as all single darts end at bust point.
Step-4 - Mark & cut slit line by going 1/3rd on neckline at neckline-centre front intersection point.
Fold waist dart as per direction of arrow shown in Step-3 to open side seam slit.
Step-5 - Trace Step-4 on separate paper & mark neckline dart.
* The dart will be marked till bust point as all single darts end at bust point.
Neckline Dart
-----------------------------------------------------------
6. Centre Front Horizontal Dart:
Step-1 - Mark slit line in centre of waist dart.
Step-2 - Cut slit line and fold shoulder dart as per direction of arrow shown in Step-1.
Step-3 - Trace Step-2 on separate paper & mark big waist dart. (trace green markings of dart).
* The dart will be marked till bust point as all single darts end at bust point.
Step-4 - Mark & cut slit line by going perpendicular on centre front line.
Fold waist dart as per direction of arrow shown in Step-3 to open side seam slit.
Step-5 - Trace Step-4 on separate paper & mark centre front horizontal dart.
* The dart will be marked till bust point as all single darts end at bust point.
Centre Front Horizontal Dart
Next week I’ll post about Anarkalis and its variations.

Please leave your valuable comments / queries and I will be happy to reply.☺☺

If you enjoyed this post, I’d be very grateful if you’d help it spread by emailing it to a friend, or sharing it on Twitter or Facebook. Thank you!

Stay connected on 
Facebook / Pinterest / Twitter / 

*******************
I love hearing from readers of my blog so please feel free to leave a comment and let me know what you thought about this post/tutorial. Any tips / hints to improve my articles are always much appreciated too!

Contact Form

Name

Email *

Message *