

* The pictures and instructions are offered here for free. Please don't repost any of my content without permission. Thanks!
Fabric used:- For making a Katori blouse with sleeve, blouse fabric should be matching to saree. You can use thin Poplin, 2 x 2, Khadi, Cambric, Organdy, Taffeta, Satin, Voile etc. However, is you are a beginner, prefer using Cotton Voile fabric. Since the Front of this Blouse is divided in four parts you can use different combinations of fabrics (i.e. plain, printed, embroidered etc) to get variations.
To make a Katori Blouse with sleeve, all measurements must be taken with great care for precise results.
Some Tip:- It is very important that you wear your best fit under garment (i.e. Bra) in order to get the most accurate measurements. If you think the bra is loose, adjust the straps accordingly, before taking blouse measurements.
You can wear a padded bra, though its optional.
You can wear a padded bra, though its optional.
Measurements required:- (in centimetres)
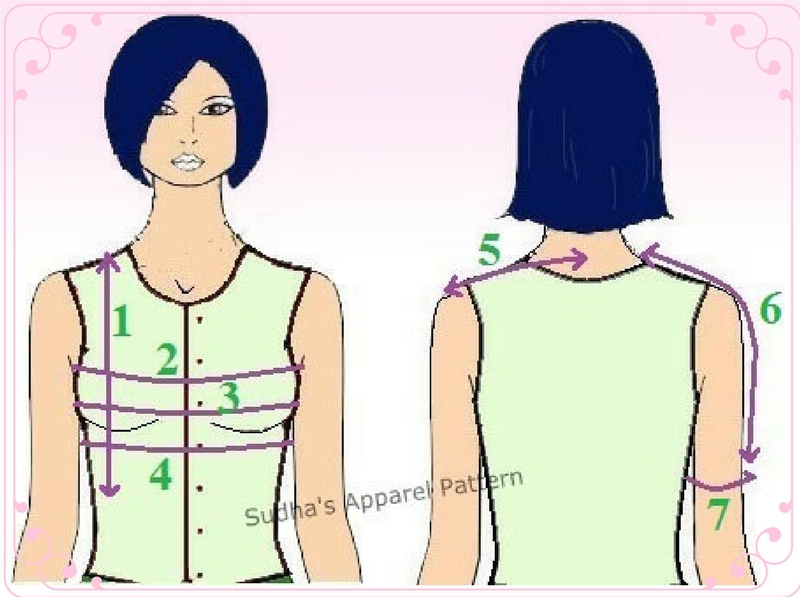
2. Round Chest - Take it by passing the tape measure around the body under the armpits. Make sure that the tape at back is over the shoulder blades, parallel to the ground and not loose or hanging at the back.
3. Round Bust - Measure around the body at the fullest point of bust. Do not allow the measure tape to fall at back. The tape should pass on the most protruding part of bust.
4. Below Round Bust - Measure around the body and below the bust.
5. Shoulder - Measure from back neck bone to shoulder bone.
6. Sleeve Length - Measure the length by keeping the measure tape from neck over shoulder till the fullest part of arm.
7. Round Arm - Measure around the fullest part of the arm which is between the shoulder and the elbow.
Complete cutting & stitching of the blouse is shown in the below given video.
7. Round Arm - Measure around the fullest part of the arm which is between the shoulder and the elbow.
Complete cutting & stitching of the blouse is shown in the below given video.
Steps of drafting:-
BACK -

0-2 = 1/5 Round Chest
2-3 & 1-4 = 1/4 Round Bust + 3 cms
3-4 = Join in straight line
1-5 = 1/4 Below Round Bust + 4 cms
Waist Dart -
Waist Dart -
1-6 = 1/10 Round Bust - 1 cm
6-7 = 2.5 cms (dart width)
7-8 = Midpoint of 6-7
8-9 = 1/8 Round Bust
Join 6-9-7 in slant line for dart
0-10 & 2-11 = Shoulder + 0.5 cm
10-11 = Join in straight line
10-12 = Down by 2 cms
0-13 = 1/10 Round Bust
0-14 = 1/8 Round Bust
Join 13-14 for Neck curve
12-3 for Arm curve
12-13 for Shoulder
3-5 for Side seam
FRONT -

0-1 = Length of front + 1 cm
1-2 = 2 cms
0-3 = 1/5 Round Chest
3-4 & 2-5 = 1/4 Round Bust + 4 cms
4-5 = Join in straight line
1-6 = 1/4 Below Round Bust + 6.5 cms
0-7 & 3-8 = Shoulder + 0.5 cm
7-8 = Join in straight line
7-9 = Down by 2 cms
8-10 = Up by 2.5 cms
0-11 = 1/10 Round Bust
0-12 = 1/8 Round Bust + 2 cms (or mark neck depth as desired)
Join 11-12 for Neck curve
0-12 = 1/8 Round Bust + 2 cms (or mark neck depth as desired)
Join 11-12 for Neck curve
4-10-9 for Arm curve
Join 4-6 in straight line

PART-1: Katori shape with Dart -
2-13 = go up by 1/10 Round Bust
5-14 = go up by 1/16 Round Bust
14-15 = 1.5 cms
Join 4-15 for Side seam
15-16 = 1/16 Round Bust + 2 cms
13-17 = go right by 3 cms
17-18 = 1/10 Round Bust - 1 cm
18-19 = 7 cms (dart width)
19-20 = Midpoint of 18-19
20-21 = 1/10 Round Bust + 1 cm (dart length)
20-22 = down by 3 cms
12-23 = 1/8 Round Bust
16-23 = Join with a curve
17-24 & 16-19 = 1/10 Round Bust - 1 cm
Join 19-21-24 for dart leg
 PART-2: Basque -
(it is the band which is stitched below the bust)
1-25 = 1/10 Round Bust + 1 cm
25-26 = 1/4 Round Bust + 3 cms
26-27 = 1/16 Round Bust + 1 cm
Join 1-27 in curve to form a Basque
2-13 = go up by 1/10 Round Bust
5-14 = go up by 1/16 Round Bust
14-15 = 1.5 cms
Join 4-15 for Side seam
15-16 = 1/16 Round Bust + 2 cms
13-17 = go right by 3 cms
17-18 = 1/10 Round Bust - 1 cm
18-19 = 7 cms (dart width)
19-20 = Midpoint of 18-19
20-21 = 1/10 Round Bust + 1 cm (dart length)
20-22 = down by 3 cms
12-23 = 1/8 Round Bust
16-23 = Join with a curve
17-24 & 16-19 = 1/10 Round Bust - 1 cm
Join 19-21-24 for dart leg

(it is the band which is stitched below the bust)
1-25 = 1/10 Round Bust + 1 cm
25-26 = 1/4 Round Bust + 3 cms
26-27 = 1/16 Round Bust + 1 cm
Join 1-27 in curve to form a Basque

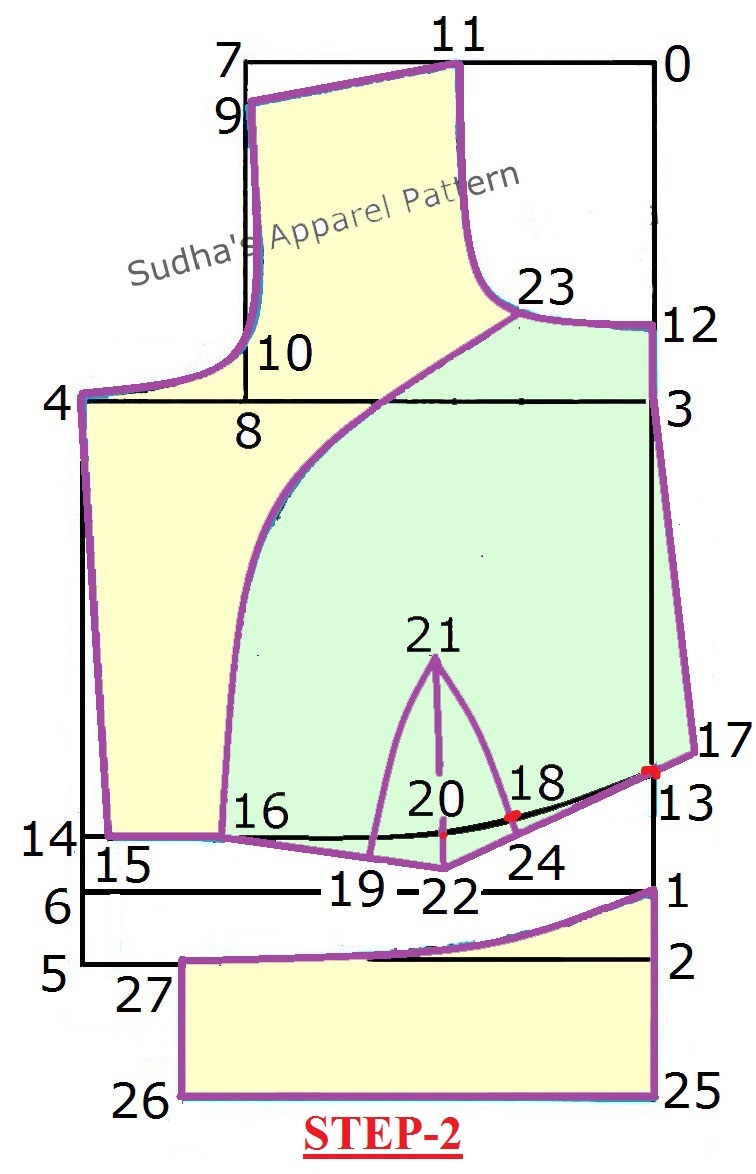
STEP-1 - Make the sleeve pattern on folded paper.
0-1 = Length of Sleeve + 1 cm
1-2 = 3 cms
0-3 = 1/5 Round Chest + 2 cms
3-4 & 2-4 = Join points
1-5 = Draw straight line
3-6 = 1/10 Round Chest + 1 cm
1-7 = 1/2 Round Arm + 2 cms
7-8 & 2-8 = Join points
6-9 & 0-10 = 1/4 of 0-6
10-11 = 2 cms
9-12 = 2 cms
6-13 = 2 cms
Join 0-11-13 (Back sleeve curve)
Join 0-12-6 (Front sleeve curve)
Join 6-7-8 for Sleeve side seam
STEP-2 - Open the folded paper to cut the front curve (see image)
STEP-3 - Final sleeve pattern with Front and Back curve.
Some Tips:- when preparing the fabric for draft placement & cutting:--
1) If using basic woven cotton material, then straighten the fabric by slightly stretching it diagonally to align the warp & weft at right angle.
2) Iron the fabric always to make it crease free prior to marking / placing the draft over it.
3) If you are a beginner, prefer making the draft on paper and then pin it to fabric.
*Once you are successful making a basic blouse you can do variations with use of different neckline shapes for front and back; different types of sleeves; try making with different fabrics like, printed/ embroidered/ checkered / striped etc. Do try and let me know in the comments box below. :)
Placement of FRONT pieces, BACK & SLEEVE drafts of Blouse on fabric -
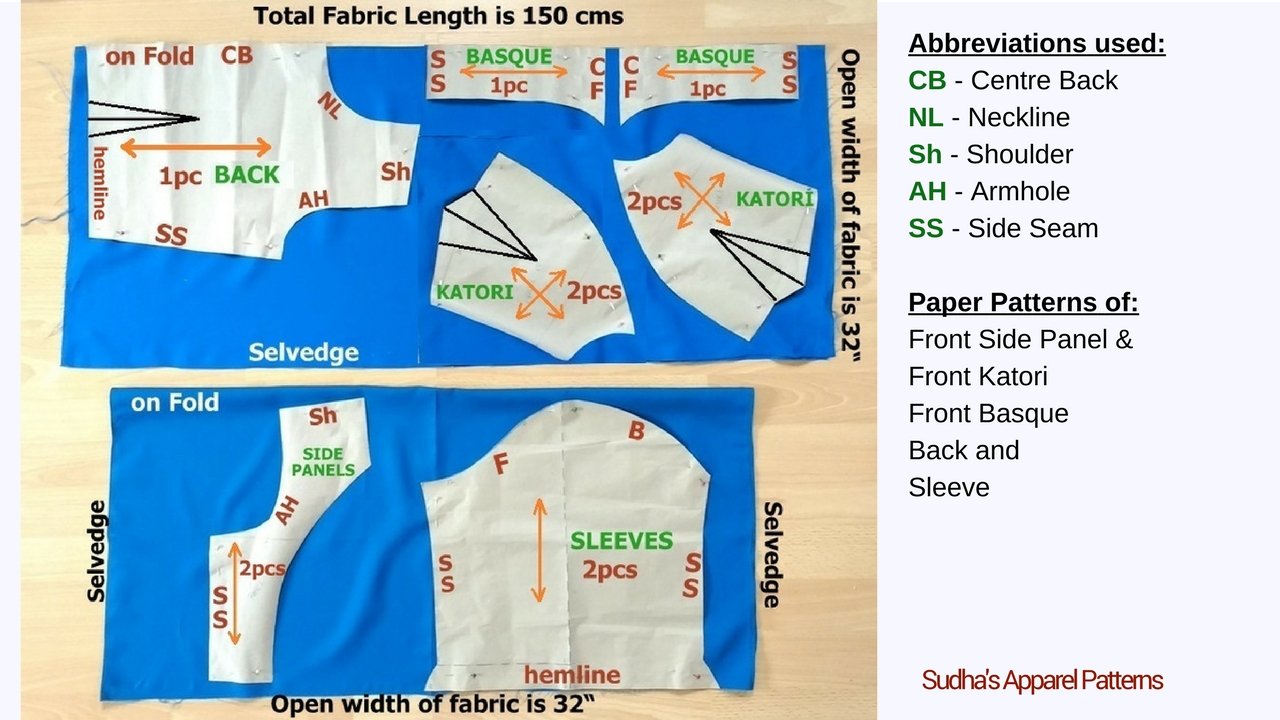
Marking of Seam Allowance -

Cutting of FRONT pieces, BACK & SLEEVE drafts of Blouse on fabric -

Please leave your valuable comments / queries and I will be happy to reply.☺☺
If you liked this pattern then Pin it!

If you liked this pattern then Pin it!

If you enjoyed this post, I’d be very grateful if you’d help it spread by emailing it to a friend, or sharing it on Twitter or Facebook. Thank you!

*********************
This comment has been removed by a blog administrator.
ReplyDeleteThanks for all the info that you have given me appreciate it its really helpful
ReplyDeletei did not understand where to take point 17 please explain me
ReplyDelete8866992439 requirement of pattern
ReplyDelete